

Updated on 8 Jan 2026
The turn of phrase, “better safe than sorry,” springs to mind when talking about backing up your website. It may seem like an afterthought, but if disaster does strike, having a recently saved version of your site to roll back to can be a lifesaver – you’ve put a lot of work into your site, and you want to keep it safe should anything happen.
From being able to revert to a previous version to being prepared should hackers try to take control, regularly backing up your site keeps your data safe. Depending on your method it can get a little complicated, but we’re here to simplify and break things down for you. We’ll walk you through:
- What website backups are and why they’re important
- When you should back up a website
- How to back up a website manually
- How to back up a website using your web hosting provider’s services
- How to back up a website using a backup product
- How to back up a WordPress website (whether you’re a Hosting for WordPress customer or looking for our top WordPress plugins for easy backups)
- The best backup plugins you can install if you use WordPress
- Website backup best practices
So fasten your seatbelts and let’s dive right in!
What are website backups and why are they important?
A backup is simply a digital copy of your website that you can restore in case something goes wrong. What the backup includes depends on whether you have a static website on shared web hosting or use a content management system (CMS) like WordPress, and how you’re backing up your site. But a general rule of thumb is the more files you can keep safe the better. And if you’re wondering why website backups are important, it's simple – they're a plan B that protects you against data loss from cyber threats and human error.
When should you back up your website?
We recommend you always have a recent backup of your website, ideally at least daily or weekly. Obviously that will change depending on how frequently you update your website, but the longer you leave it, the more work you’re likely to lose if something happens.
It also depends on your site – smaller, static websites should be fine without regular backups. But online stores, blogs and bigger websites with more dynamic content need consistent backups. It might seem excessive, but the added cost associated with daily backups (which are usually nominal) is well worth it compared to how damaging the consequences of losing critical data could be.
Another important thing to consider is that it’s good practice to back up your entire website before making any significant changes to it, moving it to a new host, or changing your site’s domain.
What you need to back up: files vs database
There are two parts of a website that need backing up – its web files and its database. Website files are the files stored in the main directory sometimes known as ‘public_html’ or ‘htdocs’. They include core files, images, code files and static web pages, plus plugins and themes if you use a content management system (CMS).
Meanwhile, the database stores site data not included in the site files, like user info, application data and CMS data including posts, shop content, and comments. As a result, for the majority of sites, a full backup requires you to back up both the website files and the database.
How to back up your website
There are four main ways to backup a website: manual backups, using a third-party backup product, through your hosting provider or, if you use a CMS, using a plugin. Each method has it's own pros and cons. For example, manual backups are more time consuming and require a bit more technology, but they can provide extra peace of mind knowing that you have your own copy of your backup on your local machine. On the other hand, using a third-party product or a CMS plugin means that you can schedule backups and let them run automatically without you having to think about it.
Did you know? Our Hosting for WordPress has built-in automatic backups so you don't have to worry about doing them manually or using a plugin.
Manual website backups via File Transfer Protocol (FTP)
Backing up a site manually is the most time-consuming method and is suited to more tech-savvy users, but it’s sometimes necessary and can give peace of mind that you have local copies of your backup. There are two stages to this – backing up your files and backing up your database.
How to back up your website files
- Find your FTP login details. They should be in your control panel but if you can’t find them there, your hosting provider should be able to help you retrieve them.
- Download and launch a suitable client. We recommend FileZilla because it’s free, open source, and simple to use (some instructions below relate to FileZilla but should be similar in other clients).
- Connect to your FTP space. Open up your downloaded client and enter your FTP login details (server, username, and password). Click ‘connect’ and you should be connected to your FTP space.
- Create a destination folder to save your backup in. Once connected, simply right click on the bottom-left quadrant and select Create Directory, then type your preferred name. This creates a folder locally on your computer within the directory selected in the top left quadrant.
- Locate the files from your server in the top-right quadrant and drag them into your destination folder. They’re normally in a folder named ‘htdocs’ or ‘public_html’.
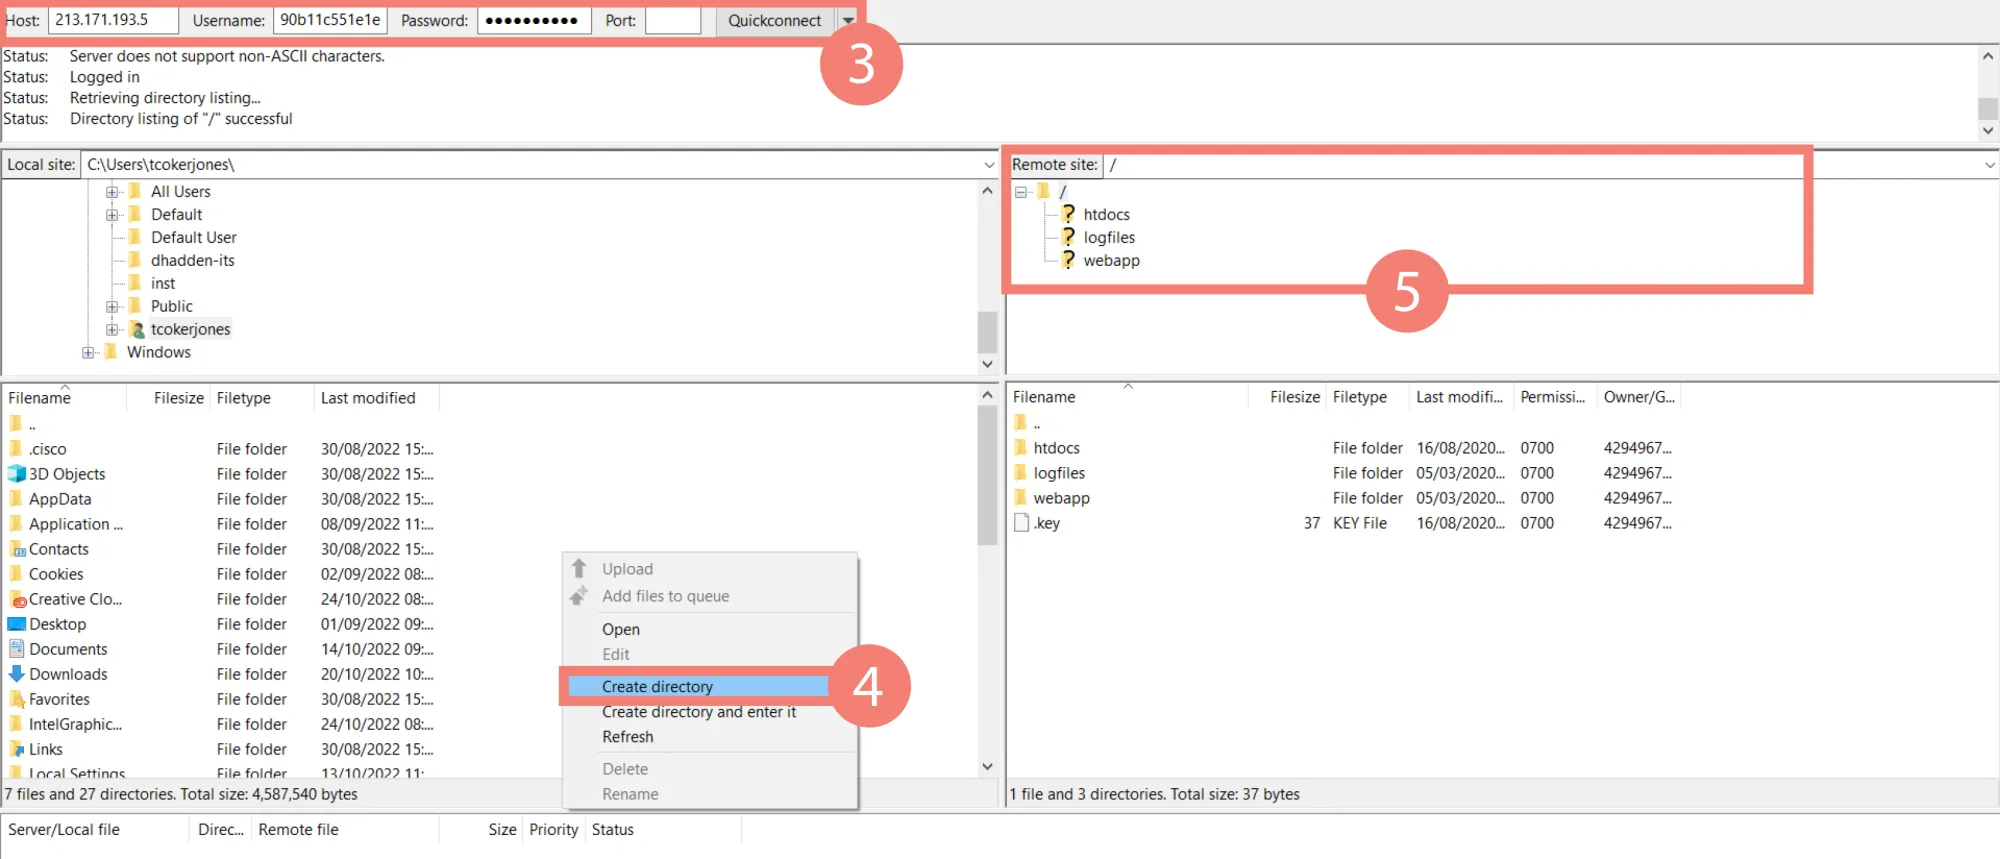
FileZilla will give you a notification once you’ve dragged it in. How long this takes will vary depending on how big your site is. Either way, by the time it’s done you’ll have a backup of your site saved onto your local device.
Top tip… If you have SSH access it’s a good idea to ZIP your ‘htdocs’/’public_html’ folder before downloading, to preserve folder structure and file formats (it will also be quicker to download!).
How to backup your site’s database
Now that we have the site files downloaded, the next step is to make a copy of the database. To do this:
- Log into the database you’re using (most providers will give you access to your database via phpMyAdmin).
- Verify which database you need to use (if you have multiple databases). You can do this by going back to FileZilla and finding your config file (this will vary depending on the CMS you are using). For WordPress as an example you’ll need the wp-config file in your root folder, which you should right click to ‘view/edit’. You can open it in Notepad to find your database name.
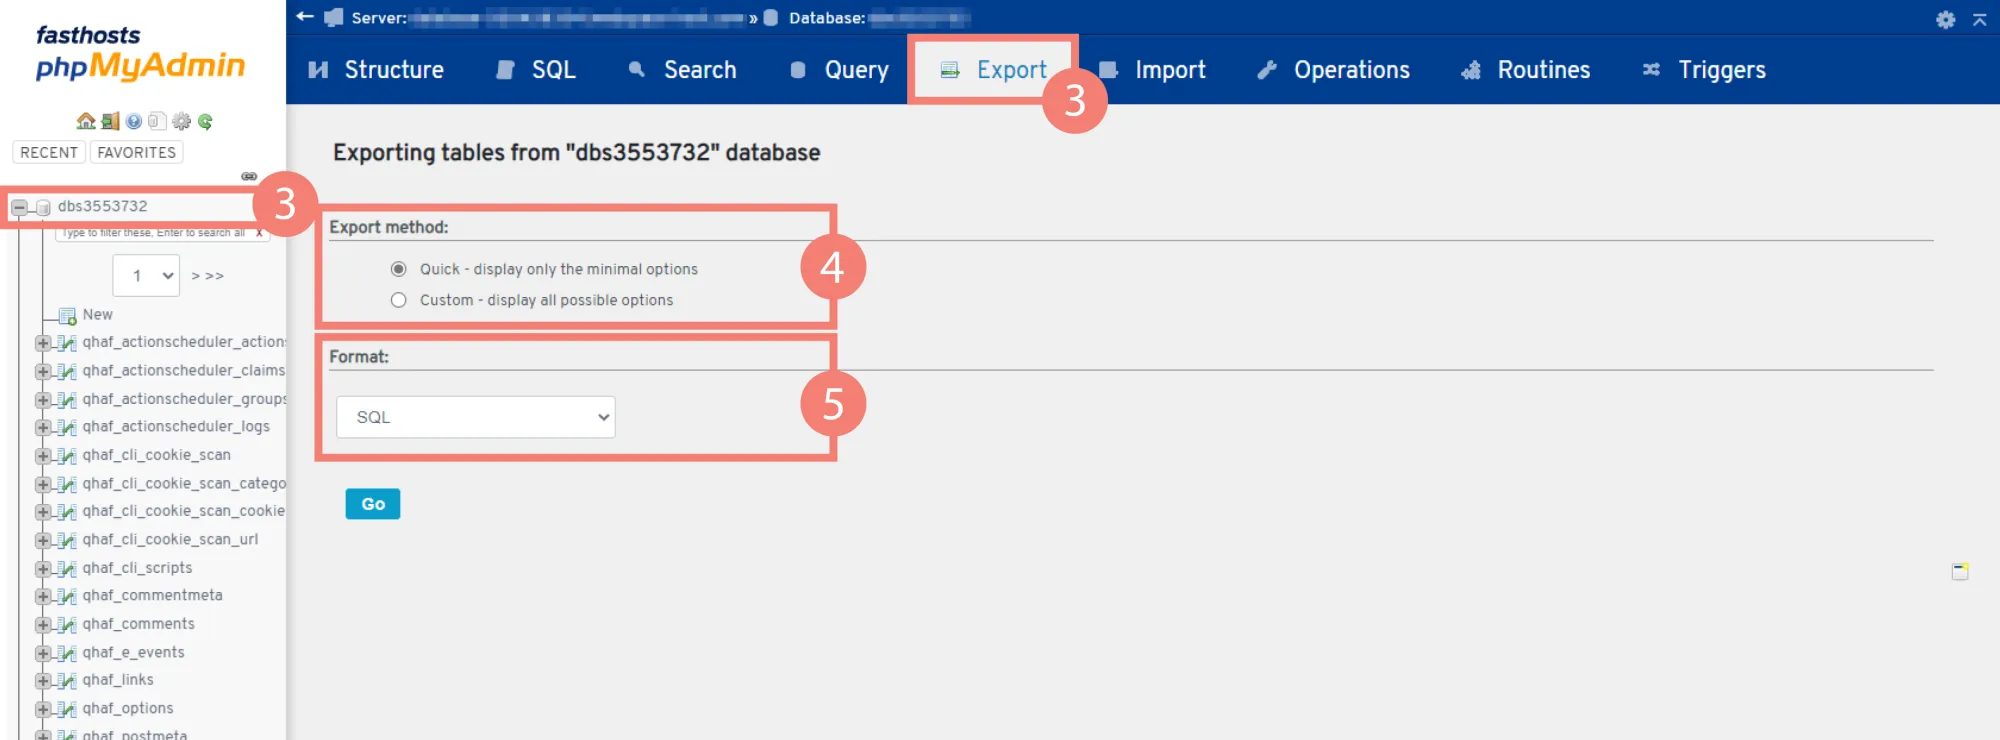
- Find your database name from the List of Current Databases and click the ‘Export’ tab at the top.
- Choose an export method. ‘Quick’ is recommended – only use ‘Custom’ if you’re familiar with using SQL tables.
- Select a file format from the dropdown. SQL is the most common format to export in.
- Click ‘Go’ to export!
Again, the download may take some time but once it’s done you’ll have a full database backup on your local device. All you have to do now is save the files in a folder with the relevant date so that you remember which version it is, and you don’t forget where it is!
Remember, if you’re experiencing issues, you can always get in touch with your hosting provider for help. While you can choose to back up your site manually, it takes some time, and mistakes can be made as a result of all the technical details involved. It’s also impractical if your website needs to be constantly updated. With this in mind, using an automated method of backing up your site can be a great way to save time, money and avoid mistakes.
Advantages of manual website backups:
- Full control. You know what you've backed up (not reliant on an automated system working/not working) and you know exactly when the backup was made.
- Full visibility. Manual backups give you an opportunity to view files and make sure there's nothing there that shouldn't be.
- Flexible. You can do manual backups on any platform that lets you access FTP (not all automatic solutions are compatible with all providers).
- Secure. The backup is already stored locally (off of the original server) so if something were to happen to the entire server, you know you've got a separate copy.
Website backups through your host
Some hosting providers make backing up your site simple to do within your control panel and many WordPress hosting packages (including ours) come with free automated backups too – with just one click you can have your website backed up.
Automated backups are the easiest way to back up a website. You can just sit back, relax and let the machine do the work. But, this doesn’t mean you shouldn’t be cautious and do your own backups too. For example, you might want to do a precautionary backup right before you make changes to your live site.
Advantages of website backups through your host:
- Simplicity. Executing backups through your hosting provider enables you to do everything in-house, so no downloading and potentially paying for third-party tools. Your backups are in the same place as your hosting plan. Easy.
- Reliability. This is the easiest way to guarantee that your website is not only backed up but also restorable too.
- Remote storage. Most providers enable both remote and local storage options for backups.
Using a backup product
With third-party cloud backup products, you can automate backing up your site if it’s not included with your hosting. It can be easily connected to your site and doesn’t require installing any plugins.
Cloud backup tools make it easy to store and access your website files no matter where you are in the world. Equipped with automatically synced data, you can rest assured that your site will always be backed up.
Even if you have automated backups included with your hosting, some products (like Cyber Protect), offer extra features too. So while it’s handling your backups for you, your site will also be protected from cyber security threats and more.
Advantages of using a backup product:
- Easy sync. With just one click you can sync your media and other files with your cloud storage.
- Quick restoration. If something happens you can quickly restore your site using your backups.
- Automatic backups.Whenever changes are made to your site, these changes are automatically backed up in your cloud storage.
- Scheduled backups.Third-party backup products can monitor your website’s update frequency and set regular backup schedules according to this.
Using a backup plugin
If you’re using WordPress or another CMS, there’s usually plenty of plugins for almost anything you need, including managing your backups. Many free plugins will give you features like automatic backups, cloud-based backup storage, database encryption and advanced reporting. If you want access to more features, you can upgrade to a paid plugin.
Advantages of using a backup plugin:
- Variety. With so many plugins out there, you won’t have much of a problem finding one that works for you.
- Automation. The majority of plugins will let you schedule automatic backups at a frequency of your choice.
- Easy to use. Unlike manual backups, it’s simpler to manage and needs less technical knowledge.
- Customisation. You’re free to chop and change which elements of your website you want to backup. Remote storage. Instead of saving backups to a local device, most plugins use remote storage options that have security benefits.
How to back up a WordPress website
As a popular, open-source CMS, WordPress is often targeted by cybercriminals. In addition to implementing common-sense security measures to protect your site, you can also improve the security of your WordPress website by saving backups regularly. This will mean cybercriminals can’t delete your data or hold it to ransom if they do manage to bypass your security.
A WordPress backup will need to save a copy of your website’s files, folders and databases, including all of your images, content, themes, plugins and site settings.
However, there isn’t currently an option to automatically back up your site within the WordPress platform. Instead, you’ll either have to back up your website manually (as explained earlier), back up your site via your Hosting for WordPress provider’s control panel (if they offer WordPress backups like us here at Fasthosts), or install a backup plugin.
Best WordPress plugins for backups
If you have a WordPress site and want to go down the plugin route there are a lot of options to choose from. As a starting point, here are three of the most popular backup plugins out there.
1. Updraft
UpdraftPlus is one of the best and most popular WordPress backup plugins on the market, used by over 3 million sites.
Even with the free version you get access to a ton of great features including scheduled backups of your website – although the added functionality of the premium version may be tempting. With UpdraftPlus, you can back up your data to your preferred storage location (such as Dropbox, Google Drive or Rackspace Cloud) and restore it whenever you need with just three clicks.
Key features include:
- Incremental backups that can be done manually or be scheduled
- Plenty of add-ons to extend functionality
- Secure storage options
- Restore backups from your control panel
- Cloning and migration
Cost: Free or Premium plans starting from around £42 per year.
2. Jetpack
Jetpack Backup was built specifically for WordPress and WooCommerce. It's definitely one of the more popular options, with more than 269 million site backups over the last ten years. One of the standout features of Jetpack Backup is that you can combine it with additional security features in the Jetpack security package, which include malware scanning and spam protection.
Key features include:
- Automated real-time backups
- One-click restores
- Integration with the Jetpack mobile app, so you can restore from anywhere
- Integration with the activity log so you can restore from a specific save point based on actions taken on your site
- On-demand backups
- Incremental backups, which keep things running quickly
Cost: The free version has features to help with your website's security, performance and growth. Full access to the premium plan costs £9 a month or £99 a year.
3. BlogVault
BlogVault is another popular backup service for WordPress, but it comes with a price tag (although it does come with a 7-day free trial). Trusted by thousands of sites, it’s great for developers and agencies managing multiple sites thanks to its regular backups of everything in your WordPress site. Plus, you can safely test your site updates with a staging site.
Key features include:
- Automatic backup of your website on a daily basis
- Manually create unlimited on-demand backups
- Incremental backups that sync even the smallest changes for minimal server load
- You can easily recover your website from up to 90 days with free plans, and 365 on premium plans
- A built-in staging site feature that lets you test your website easily
- Easy host migration
Cost: 7-day free trial then approx. £79 per year for a 1-site Basic plan with prices increasing for more premium plans.
Website backup best practices
As we’ve established, backing up your website is absolutely crucial for protecting your data (and customers’ data) against security breaches or website failures. Even if the worst should happen and you lose access to the current version of your site, having a website backup will mean that you can restore a recent version of your site and continue business as usual.
If you’re new to owning a website, here are some best practices to keep in mind when backing up your site:
1. Choose a backup method
The first thing you need to do is choose whether to back up your website manually, through your hosting provider or with a backup product or plugin. Think about whether you have the technical know-how to do this yourself, or whether you would benefit from the ease and convenience of automatic backups through a tool or your web hosting plan.
2. Set a backup schedule
Consistency is extremely important with website backups – if you miss a few, this could be problematic if you encounter an issue and recent website changes haven’t been saved. You may be able to benefit from an automatic update schedule with certain backup tools, but if you’re doing it manually, make sure you set yourself a schedule and stick to it. Here’s a rough guide to how often you should back up your website:
- Daily: Dynamic, frequently updated websites (such as large ecommerce websites) with a lot of data and content should fit into this category.
- Weekly: If your website is updated regularly but not quite as frequently (i.e., a blog site), a weekly backup will probably be sufficient.
- Monthly: Small, static websites that aren’t updated often (such as small business websites) may be able to get away with a monthly backup schedule.
3. Use the 3-2-1 backup strategy
The 3-2-1 backup rule is a common strategy that helps you create more secure backups. As suggested by the name, there are three main parts to this strategy:
- Keep three copies of data. This will include the original data and two backups.
- Your two backups should be stored on two different types of media. For example, you could store one backup on an external hard drive and the other on a cloud server.
- One of these backups should be stored off-site to shield it from physical dangers on the premises (e.g., fire, flooding).
4. Test backup restoration
Don’t forget to test the restoration process. You may be great at scheduling regular backups, but what would you do if you couldn’t actually restore this data properly when you need it?
In addition to handling backups, you should also schedule time to regularly restore backup files to check that this process works as it should. This will prevent you from encountering a nasty surprise when you need to access this data.
5. Secure your backups
Backups can help protect your data against cyber attacks, but they can also become a point of vulnerability themselves if they aren’t properly secured. To prevent unauthorised access to your backups, you should set secure access credentials and make sure only trusted people have permission to view and edit these files. You can also encrypt these files to thwart hackers.
Putting the pieces together…
If you’re struggling to remember all of the above, here are some of the key takeaways:
- A backup is a digital copy of your site that acts as a protective measure against losing your site data in the event of a disaster.
- While there’s no hard and fast rule about how often you should backup, we recommend backing up your website on a daily basis or at least weekly.
- To fully backup your site (depending on your site and hosting type) you should back up both the website files and the database.
- Manually backing up your website is the more complicated way to do it, but once it’s done you know it’s backed up 100%.
- Backing up your website through your hosting provider service is the easiest way to backup your website, but it’s not provided by every hosting provider.
- Some hosting providers offer more comprehensive backup tools that include cybersecurity features too.
- Backing up your CMS site using a plugin is a quick alternative.
Need help backing up a site hosted with Fasthosts? Our support team is on hand 24/7 to answer your questions.